HPCS has conducted a great deal of work on behalf of the Historic House Museum Community. Our tips on What Not to Do with historic plaster come from more than a quarter century of experience. Anyone with important plaster to take care of can benefit from these pieces of advice. Please feel free to contact us if you have suggestions on how we can improve this section of our website or if you have questions related to your your important plaster project.
We have identified five specific areas of What Not to Do – or, in some instances, What to Do – when dealing with important plaster:
- Documenting your plaster problems
- Temporary support of plaster ceilings
- The use of screws and washers
- Pouring plaster over back of lath
- Lamination with drywall
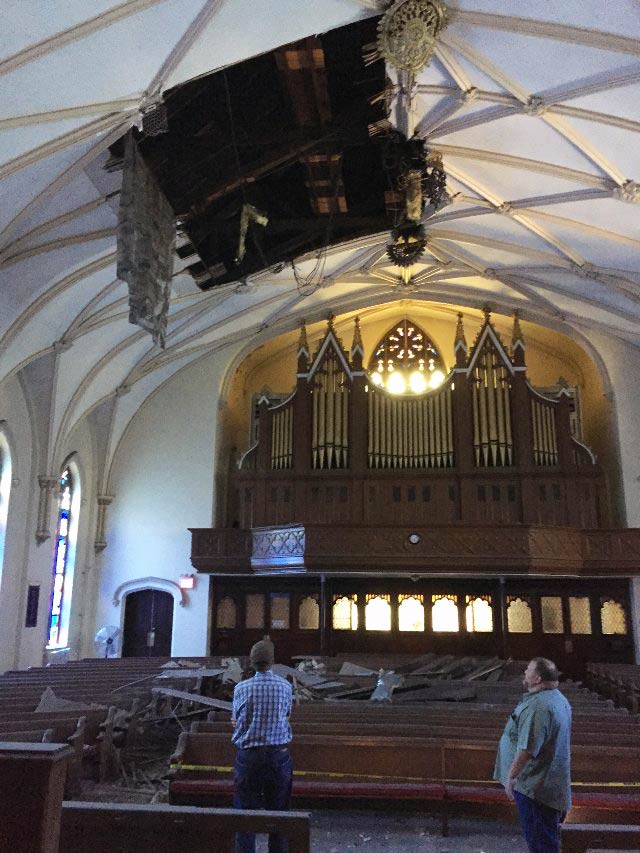
This is what can happen when a plaster ceiling is overloaded with drywall
Documenting Your Plaster Problems
Let’s start off on a positive note: the first thing you want to do is protect the artifacts that will be at risk if the situation worsens. The right way to begin is by recording the conditions in the room using the best digital camera you have. If you’re using a phone, make sure you have good light on the subject so fine details are adequately captured.
Take as many pictures as possible – at least a dozen. If you can, insert some orientation tags into the frame with boldly marked compass directions. Post-it® Notes work well for this. Include a picture of the floor plan of the part of the building where the problem is located. A simple floor plan associated with the fire safety plans is often available if it is a public building.
As for pictures of the actual plaster, it is important to take both long-view shots and close-ups. If plaster has actually fallen, take a good close-up, cross-section shot of any debris, preferably before it is disturbed. (By the way, don’t throw out the debris just yet – it can be very informative, but that’s another subject)
Get close-up and mid-range shots of the substrate at the ceiling, which is probably wood lath. When this is done, think of anything else that would help a professional who isn’t on the scene come to an understanding of what’s going on with the plaster. HPCS was once called to a house museum to look at plaster that had collapsed in an upstairs bedroom, and it wasn’t until we arrived that we learned that the plaster failure was caused by the collapse of the roof under a heavy load of snow. The general rule is to record the conditions as best as possible. In most cases, help in this kind of situation is not readily available, so transmitting a clear and detailed depiction of the problem is very important for getting off on the right foot with whoever is called upon to conduct the remediation and repair.
Temporary Support of Plaster Ceilings
HPCS is often called to a historic house museum because the plaster ceiling is showing signs of failure. Sometimes a section of plaster has already collapsed. Sometimes there is an alarming crack across what was once a perfectly good ceiling. Faced with these conditions of concern, what should the museum curator or other person responsible for the plaster do first? What should they not do?
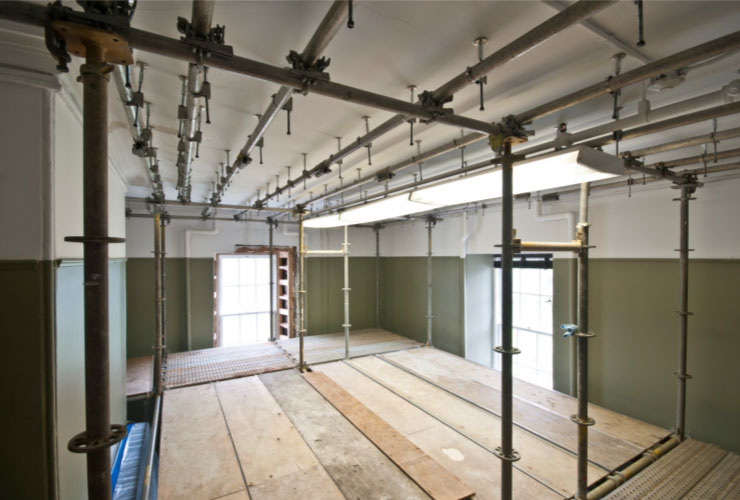
Temporary ceiling support using HPCS Micro-Jacks
What Not To Do!
On many occasions, when we arrive at the site, we are brought into a room that has a large piece of padded plywood propped up against the ceiling with dead man jacks (usually 2”x4”). The padded plywood is slightly longer than the height of the ceiling and is jammed into place against the ceiling. While this type of temporary support measure is undoubtedly well-intentioned, it is one of the worst things a manager can do under the circumstances for two simple reasons: First, it prevents the called-upon “expert” from being able to observe the condition of the plaster above the plywood; and second, the plywood will have to be removed, and when it is, a good deal more plaster will in all likelihood come down because of the flexing that took place when the plywood was forcibly installed.
Sometimes several lightweight aluminum screw jacks or extension poles used by house painters are deployed instead of the crude plywood. These tend to cause the same problem. Our recommendation is to avoid any flexing of the structure above the subject ceiling as much as possible. This might mean closing the room above or that sort of thing, but that is the limit.
HPCS has developed a system of Micro-Jacks™ specifically designed for temporary support of ceiling plaster while conservation or repair work is being done. These Micro-Jacks™ allow access to the ceiling surface while providing sturdy but gentle support for plaster that might fail. We know of no better way to support and protect decorated plaster ceilings that are in unstable condition.
Given that you probably don’t have a supply of HPCS Micro-Jacks™ at hand, here are some basic principles to follow as you direct the installation of temporary support as a workable, if not perfect, alternative to the ill-advised plywood & dead-man jacks method.
Provide support without lifting or flexing any of the plaster. This cannot be accomplished with poles or props. To keep the ceiling in place, gentle pressure must be applied between the floor and ceiling. You need something that has its own stability and to which one of those telescoping support jacks can be connected. In a room where the ceiling isn’t too high, a simple Christmas tree stand can work. A good photographic tripod is even better. Any carpenter can fashion what is needed out of inexpensive lumber in just a few minutes. The point is that you need a stable base so that your vertical support makes only the gentlest contact with the damaged plaster. Usually, several of these supports along the offending crack line or at the perimeter of the fall area are needed. Note that the actual contact point with the ceiling will be small, can be controlled very precisely by moving the base, and that appropriate padding can be jury-rigged to the contact point to protect the ceiling.
The objective is to prevent further collapse and damage until professional advice can be obtained. It’s always a good idea to include measures for temporary supports in your disaster preparedness plan so they will be easy to find in the event of a partial collapse.
The Use of Screws & Washers
By screws and washers, we mean any kind of wood screw and any kind of washer where the screw is put through the washer and permanently connected up through a plaster ceiling into some part of the wood substrate above. Sometimes the washer is countersunk into the plaster, but in all cases, after installation, a skim coat of repair compound is applied to the surface and the area is made ready for repainting.
This method has been around since plaster started falling on people’s heads, which is to say, a long time. In one form or another, it has been a staple of the folks who make general repairs to plaster.
How you might ask, can such a widely used and easy-to-master technique be on the HPCS “What Not to Do” list?
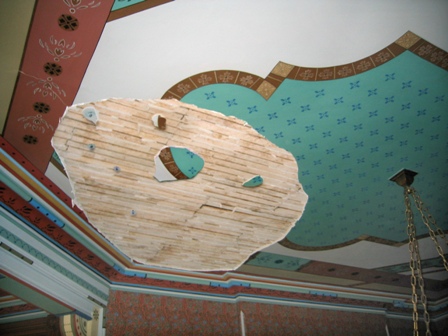
This is what a historic plaster ceiling looks like when screws and washers fail
Here’s why. It doesn’t much matter what Fred and Betty do to their bungalow when and if the plaster starts falling off. If Betty is handy, they can get the place more or less shipshape with a few hundred screws & washers and a couple of boxes of sheetrock compound. There are plenty of DIY TV shows and YouTube videos to show the way, and that’s great.
However, those responsible for cultural heritage are dealing with a different challenge altogether. They aren’t trying to maintain the resale value of their museum. They are trying to protect and perpetuate the cultural value of the resource and the information it embodies. Not quite the same mandate, wouldn’t you say?
So, historically or culturally important buildings clearly require a different standard of care.
As a long-standing practitioner of special care for culturally significant buildings, we take exception to the preponderance of DIY solutions creeping into the maintenance protocols for historic house museums, apparently because of budget constraints.
This is a discussion about what is wrong with using the ordinary repair methods of the Home Depot and This Old House variety to maintain properties that we are expected to keep in respectable condition forever. Forever means never having to say you’re sorry. It means that exceptional interventions into the maintenance of the heritage fabric should be measured against the highest standard – i.e. what would be done if the budget was not a concern?
It may surprise some, but budget constraints are only one reason that we see an increase in DIY techniques used in historic buildings. We will discuss other cultural (driving?) forces in future pieces.
In our view, screws & washers used for plaster ceiling repair in historic buildings are the wrong approach for a variety of reasons:
- Screws & washers offer a cosmetic solution to a structural problem. Plaster ceilings fail because the keys and lugs – the structural mechanisms that hold the ceiling up – inevitably deteriorate. In other words, inserting screws and washers does not attend to the overarching problem of loss of strength and structural support.
- They ignore the fact that material has broken off the back side of the plaster and has found its way into the space between the lath and the plaster. This material will not disappear with the force of the screw being torqued up. As a result, the plaster is often crushed as the screw tightens, and what little strength was present in the old material is reduced even further.
- Screws & washers invariably fail or, at best, require renewed intervention within a short period of time. Because every building experiences micro-movements from shifts in the earth’s surface, the screws and washers will eventually – and a lot sooner than one would hope – come loose and abandon their support of the ceiling.
- They require the application of a great deal of new material for concealment. This new material is almost always of a very different composition from the original material and is applied over previously painted surfaces. This violates one of the basic principles of heritage conservation, which is to preserve the original fabric for time immemorial.
- Another important point worth mentioning is that when the technician is tasked with installing a grid of screws & washers across an entire ceiling or along a roadmap of crack lines, he is very much aware that he will later be required to hide the screw heads and washers beneath some applied compound in order to make the ceiling flat and smooth again. As a result, the impulse to tighten the screws and “snug” the washers up against the plaster is very strong and that is what usually happens.
- The cosmetic application of screws & washers is usually made to a very low standard, which is, admittedly, a somewhat moot point because even if the work is done to a very high standard, it is still the wrong approach for the reasons described above.
All of this said, the installation of a screw with a large washer on important plaster may be appropriate as an emergency temporary measure, in which case the application should be gentle and just enough to hold and support the surrounding plaster in place until the problem can be properly addressed.
Pouring Plaster Over the Back of Lath
In the old days – and still in some parts of Europe today – a popular method of reattaching plaster was based on the belief that only material similar in nature to the original material should be used. This is referred to as the “repair like-with-like” dictum.
Typically, the plaster keys are removed, wire mesh is fastened to the back side of the wood lath, and plaster of Paris is poured over the wire mesh in an attempt to bond the lath to the plaster below.
The main drawback of this method is that no real or lasting bond is established between the new plaster of Paris and the existing lime plaster. Before long, a separation appears, and failure ensues. There are many examples of this treatment method failing within a few years of application.
Covering Plaster on Wood Lath with Drywall
Efforts to cover deteriorated plaster on wood lath with drywall are fraught with risk. If a wood lath and plaster ceiling has failed and sections/pieces have fallen, it is essential to understand the condition of the rest of the ceiling before considering any attempt to laminate a new board material over it.
Drywall screws are designed to hold the weight of the drywall but not the additional weight of the plaster. In other words, if the ceiling is in precarious condition, it will eventually fail as the new weight of the sheet goods is added to the weight that is already there. Drywall or sheetrock is held up with screws. They are precisely engineered to work with the paper coating on that material to hold that material up, and no more.
Doubling up the number of screws is often suggested, but in that design, many of the screws will be contacting wood lath and not a structural member that might be strong enough to provide support.
We know of no specifications provided by drywall or sheetrock manufacturers to use their products in this way.
Some success has been achieved by installing strapping across the ceiling and securing it to the structure. The drywall is then fastened to the strapping. However, this method is rather impractical, laborious and often costly. The added thickness of the strapping will, in some cases, compromise architectural details at the connection between the ceiling and cornice or other architectural features.
Covering Plaster on Metal Lath with Drywall
Laminating drywall onto plaster on metal lath is an even more dubious proposition, which is why the drywall or sheetrock industry does not recognize or recommend this procedure. In an installation, the screws would be expected to penetrate the old plaster and then find traction in the expanded metal lath above. It might be possible to have a technician in the attic place flat blocks of plywood over the screw locations as the work progressed, but it would be very difficult to verify that this approach actually worked as intended.
There are much better—and simpler—ways to achieve long-term stabilization of plaster on wood and metal lath than laminating the plaster with drywall.
Contact HPCS to request a consultation regarding your historic plaster project.